
The Ridgeway by Kelty Tent is a durable, 4-person camping tent designed for ease of setup and spacious comfort. This guide provides a comprehensive overview of its assembly process, ensuring a successful camping experience.
1.1 Overview of the Ridgeway by Kelty Tent
The Ridgeway by Kelty Tent is a durable, 4-person camping tent designed for outdoor enthusiasts seeking comfort and reliability. Measuring 16 x 9 feet, it offers ample interior space and includes an additional 5 x 8-foot screen room for extra versatility. Built with high-quality materials, this tent is engineered to withstand various weather conditions while providing a spacious and well-ventilated living area. Its sleek design and multi-diameter pole configuration ensure stability and ease of assembly, making it a popular choice for campers of all skill levels.
1.2 Importance of Proper Assembly
Proper assembly of the Ridgeway by Kelty Tent is crucial for ensuring structural integrity, safety, and optimal performance. Incorrect setup can lead to pole damage, uneven surfaces, or exposure to weather conditions. By following the instructions carefully, campers can avoid common pitfalls and ensure the tent stands stable and secure. Proper assembly also enhances durability, prolonging the lifespan of the tent. It guarantees a comfortable and stress-free camping experience, allowing users to fully enjoy the outdoors without unnecessary challenges. Attention to detail during setup is key to maximizing the tent’s functionality and reliability.

Key Components of the Ridgeway by Kelty Tent
The Ridgeway by Kelty Tent features durable poles, sturdy hardware, weather-resistant fabric, and essential stakes. These components work together to create a reliable and comfortable shelter.
2.1 Identifying the Tent Poles and Hardware
The Ridgeway by Kelty Tent includes color-coded poles for easy identification. The main poles form an X shape, while shorter ones support the tent’s roof. Hardware such as grommets, clips, and sleeves secure the poles to the tent fabric. Stakes and guy lines are provided for anchoring the tent firmly to the ground. Properly identifying and organizing these components is crucial for a smooth and efficient assembly process, ensuring the tent stands sturdy and secure in various weather conditions.
2.2 Understanding the Tent Fabric and Layout
The Ridgeway by Kelty Tent features durable, weather-resistant fabric designed for longevity. The tent’s floor measures 16 x 9 feet, offering ample space for four people. A built-in screen room adds extra storage or relaxation space. The layout includes color-coded clips and sleeves for easy pole attachment. The fabric is lightweight yet robust, ensuring excellent ventilation and protection from the elements. Familiarizing yourself with the tent’s fabric and layout helps streamline the assembly process, ensuring a secure and comfortable camping experience.

Preparing for Assembly
Choose a flat, debris-free area for setup. Unpack and organize all components, including poles, stakes, and rainfly. Ensure the ground is even and clear for smooth assembly.
3.1 Choosing a Suitable Camping Location
Selecting the right spot for your Ridgeway by Kelty Tent is crucial. Look for level ground to ensure even setup and stability. Clear the area of rocks, branches, and debris to prevent damage to the tent. Avoid low-lying spots where water may collect in case of rain. A flat, grassy surface is ideal. Ensure the location is far from overhead hazards like tree branches and power lines. Proper site selection enhances safety and ensures a smooth assembly process.

3.2 Unpacking and Organizing the Tent Components
Begin by carefully unpacking the Ridgeway by Kelty Tent from its storage bag. Lay out all components, including poles, tent fabric, stakes, and the rainfly, on a clean, dry surface. Organize the parts into logical groups to avoid confusion during assembly. Check that all items are included and undamaged. Separate the poles, ensuring they are labeled or color-coded for easy identification. This step ensures a smooth and efficient setup process, preventing delays or frustration later on.
Step-by-Step Assembly Instructions
Assemble the Ridgeway by Kelty Tent by attaching poles to corners, connecting them to form the structure, and securing with stakes. Attach the rainfly for completion.
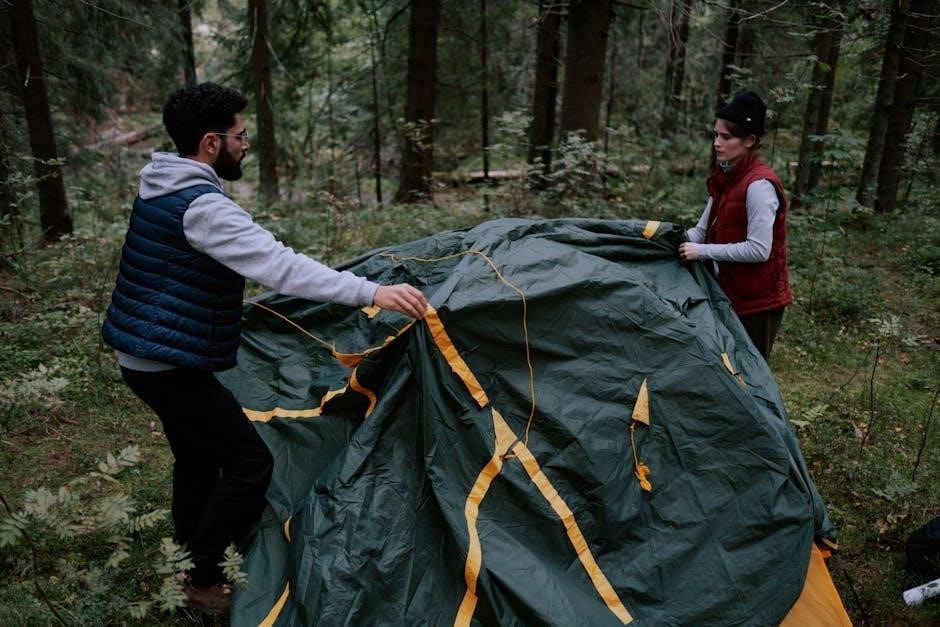
4.1 Attaching the Tent Poles to the Corners
Begin by inserting the pole tips into the grommets located at each corner of the tent. Ensure the poles are fully seated and aligned properly. Use the supplied clips to secure the poles to the tent fabric, making sure they click firmly into place. This step is crucial for maintaining the tent’s structural integrity and ensuring a stable setup. Once all poles are attached, proceed to connect them to form the tent’s framework.
4.2 Connecting the Poles to Form the Tent Structure
Once the poles are attached to the corners, connect them by snapping the pole hubs together. Ensure the poles form a sturdy “X” shape, creating the tent’s roof structure. Gently push the poles upward to form the tent’s frame, making sure they are fully extended and securely connected. Align the poles with the tent’s fabric, ensuring the structure is even and balanced. This step establishes the tent’s shape and stability, preparing it for standing upright and securing with stakes.
4.3 Standing the Tent Upright and Securing with Stakes
With the poles connected, carefully lift the tent upright, ensuring it stands balanced. Attach the rainfly to the top of the tent using the provided clips or hooks. Stake each corner of the tent firmly into the ground, starting from the front and working your way around. Tighten the rainfly by pulling it taut and securing it with stakes. Double-check all connections and ensure the tent is stable. Use additional stakes to reinforce the sides and doorways for maximum stability and weather resistance.
4.4 Attaching the Rainfly and Final Adjustments
Once the tent is upright, attach the rainfly to the top using clips or hooks. Ensure it’s evenly spread and taut, then secure it with stakes. Tighten the tent fabric by adjusting the stakes and pole connections. Verify all clips and hooks are properly engaged. Make final adjustments to the tent’s alignment and tension. Double-check the rainfly’s positioning to ensure it’s centered and securely fastened; Stake the rainfly’s edges tightly to prevent sagging. Finally, inspect all components to ensure stability and weather readiness before completing the setup.
Common Challenges and Solutions
Common challenges include pole damage and rainfly alignment issues. Solutions involve careful handling and precise stake placement to ensure stability and weather resistance.
5.1 Avoiding Pole Damage During Setup
To prevent pole damage, handle them gently and avoid stepping on or striking them against rocks. Ensure pole tips are securely inserted into grommets and avoid forced bending. Always assemble poles on a soft, clear surface and store them in protective sleeves when not in use. Regularly inspect poles for signs of wear or damage and replace any broken sections promptly. Proper care ensures longevity and maintains the tent’s structural integrity for reliable performance during camping trips.
5.2 Troubleshooting Common Assembly Issues
Common issues during assembly include poles not fitting securely, the tent not standing upright, or the rainfly not aligning properly. If poles don’t fit, check for correct alignment and ensure all connectors are properly attached. If the tent sags, adjust the stake placement and tighten the rainfly. For the rainfly, verify it’s oriented correctly and attached to all designated points. If problems persist, refer to the user manual or contact Kelty’s customer support for assistance. Proper troubleshooting ensures a stable and secure setup for your camping experience.
Tips for Efficient Tent Assembly
Practicing setup beforehand ensures a smooth process. Organize components, use the correct tools, and follow the sequence to avoid delays. Proper preparation enhances efficiency and safety.
6.1 Practicing Setup Before Camping
Practicing tent assembly at home ensures familiarity with the process and identifies any potential issues. Start by laying out all components and following the manual step-by-step. Pay attention to pole connections, fabric alignment, and stake placement. Regular practice reduces setup time and stress during trips. It also helps in mastering techniques to secure the tent firmly, making camping more enjoyable and efficient. This preparation is key to a hassle-free outdoor experience with the Ridgeway by Kelty tent.
6.2 Maintaining the Tent for Future Use
Proper maintenance ensures the longevity of your Ridgeway by Kelty tent. After use, clean the tent fabric with mild soap and water, avoiding harsh chemicals. Allow it to air dry completely before storage. Store the tent in a cool, dry place, away from direct sunlight. Regularly inspect poles and hardware for damage, replacing any worn parts. Use the rainfly during rainy conditions to protect the tent. Following these steps will keep your tent in excellent condition for future camping trips and ensure optimal performance.
Setting up the Ridgeway by Kelty tent is straightforward with proper preparation and care. For detailed instructions, refer to the user manual or visit the manufacturer’s website for additional resources.
7.1 Final Checks and Ensuring Stability
After assembling the tent, perform a final inspection to ensure all poles are securely connected and the structure is stable. Check that all stakes are tightly secured to the ground, and the rainfly is properly attached. Verify that the tent fabric is taut and evenly spread to avoid sagging. Make sure all zippers and doors are functioning smoothly. Finally, walk around the tent to ensure it’s balanced and evenly supported. This step is crucial for withstanding wind and weather conditions during your camping trip.
7.2 Referencing the User Manual for Detailed Instructions
For comprehensive guidance, refer to the Ridgeway by Kelty Tent user manual, which provides detailed, step-by-step assembly instructions. The manual includes diagrams and specific tips to ensure a smooth setup process. It covers pole assembly, fabric attachment, and stake placement. If you encounter challenges, the manual offers troubleshooting solutions. Always follow the manufacturer’s guidelines to maintain the tent’s durability and performance. If the manual is missing, contact Kelty’s customer service or visit their official website for a digital copy. This resource is essential for a successful and stress-free camping experience.